
The Complete Guide To Guitar Neck Relief For Electric, Acoustic, Bass And Classical Guitars
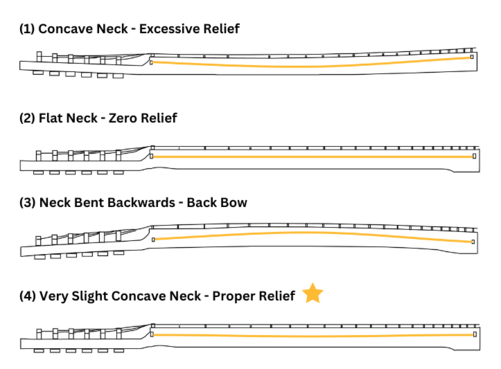
What is Guitar Neck Relief?
Neck relief is the amount of curvature in the neck from front to back.
- If you have a guitar or bass neck that looks like a banana, it’s very curved in a concave way that would have a lot of relief or excessive relief.
- You have a perfectly flat neck and have zero relief, if you put a straight edge on the frets and it touches them all.
- If you have a neck that’s bent backward, that would be called back bow.
- Proper Neck relief will have a very slight concave neck.
Why Is Proper Guitar Neck Relief Important?
Having the correct neck relief is the starting point and foundation for a great playing and sounding guitar. It will give you comfortable action for playing up and down the fretboard, eliminate fret buzz and play in tune. If you don’t have enough relief in the neck, you will often have fret buzz in the low registers. You’ll have an uneven action because the action at the bridge needs to be raised to create space for the vibrating string. You’ll have very low action in the first position, which will diverge significantly and feel very high up at the top.
When you have too much relief, you’ll have a high action in the center of the neck. Sometimes it will buzz in the middle because the end of the neck is coming up. Since the neck is so curved, if you have a low action it’s going to be very buzzy in the center of the neck. When you have your relief set correctly, you will have just enough curvature in the neck so that the string has room to vibrate.
The guitar string is held fixed at either end, so when you pluck the string, it generally vibrates in an oval pattern. The center of the string is the largest arc so having a little relief in the neck creates a pocket for that string to vibrate in. By having that little bit of relief, you will be able to have a very even action all the way up the neck with no buzzing anywhere on the fretboard.
Why Does My Guitar Neck Relief Change?
There are several reasons why over time the guitar neck relief and truss rod tension will change to either too much or too little relief. The change in humidity and temperature can cause the fretboard to expand and contract and the neck relief will change. Also, the constant string tension can cause neck relief changes. Proper neck relief can be easily fixed by adjusting your truss rod.
When Should I Check My Guitar Neck Relief?
The main time to check your neck relief is if you are getting fret buzz, as proper neck relief can solve that. Another issue would be if you feel your action is high, causing playability and tuning issues. Another great time to check is when humidity changes with the seasons. Also, when you change your strings, it causes less tension on the neck, which could cause neck relief changes to occur. Therefore, the perfect time to check for proper neck relief is every time you change your strings.
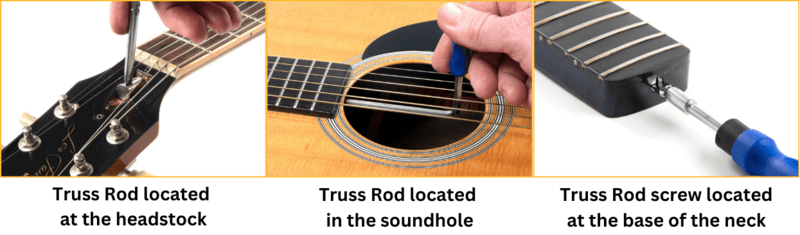
Where Is The Truss Rod Located To Adjust?
The guitar truss rod is located at the headstock on most electric, acoustic and bass guitars. On the headstock, often there is a truss rod cover with 2 or 3 screws that you would remove to access the nut of the truss rod. If you don’t see the Truss Rod access point at the headstock, there are a couple of other areas it could be. For some acoustic guitars, the truss rod access is in the soundhole near the base of the neck. A long L-shaped Truss Rod Wrench can reach the truss rod nut and adjust it. A small percentage of electric and bass guitars have a truss rod screw at the base of the neck. It is best to remove the neck from the body to adjust the nut and the heel.
Join Team Blue
Join MusicNomad’s Team Blue Monthly Newsletter, which features exclusive giveaways, how-to videos, tech tips, new product announcements, and more!

What Tools Do I Need To Check My Neck Relief Action and Adjust My Truss Rod?
There are a few tools you will need to check and adjust neck relief: Feeler Gauges, Capo, proper wrench size for the instrument and a screwdriver if there is a truss rod cover.
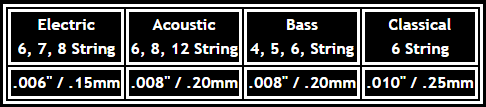
- A feeler gauge set to measure the guitar neck relief that has the following gauge sizes: .006″ (.15mm) for electric guitars, .008″ (.20mm) for acoustic and bass guitars and .010″ (.25mm) for classical guitars. MusicNomad has developed a specialized Truss Rod Gauge that has these 3 sizes with the type of instrument etched on the gauge making it super simple. The Truss Rod Gauge is also included in the MusicNomad Setup Gauge 6 pc. Set which gives you all the gauges you will need to properly setup your guitar or bass.
- A capo to hold the low E string down at the first fret. MusicNomad’s Truss Rod Gauge comes with a specialized pick capo. If you pick this up, you will not need a capo.
- Finding the correct truss rod wrench can be difficult. You can check the manual for the guitar brand you have or contact the guitar maker. We have created a convenient free online tool that gives you the correct truss rod wrench size for over 75 guitar brands, including by model and year. If you have a lot of guitars and want one truss rod wrench set to cover almost all guitar and bass truss rod nuts, get the MusicNomad Truss Rod Wrench 11 pc Set.
- Phillips Screwdriver, which on MusicNomad socket wrenches they have a built-in magnetized screwdriver that is great for those tiny screws.

")
Do I Adjust The Truss Rod With The Strings On Or Off?
Always adjust the truss rod with the strings on and in tune.
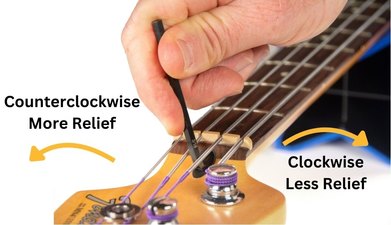
Which Way Do I Turn The Truss Rod To Add Or Take Out Relief?
Whenever you use a wrench to adjust the truss rod to determine which way to turn it, approach the turn as if you were standing behind the wrench and staring at the nut. Take this same approach whether the truss rod nut is at the headstock or at the heel of the guitar, like Vintage Fender guitars, or inside an Acoustic Guitar soundhole at the base of the fingerboard. The approach would be to turn counterclockwise to loosen and add more relief into the neck and you would turn clockwise to tighten and have less relief in the neck.
How Do I Fix My Guitar Truss Rod If It Feels Stuck When I Try To Adjust It?
If you go to adjust your truss rod and it feels stuck, never force it. If you feel like you have to put a lot of tension on it, stop because it might be seized. The reason could be that it is out of threading and the nut is buried on the end. Another reason is it could be rusted. To fix this, you should first try going backward (counterclockwise) and loosening the nut with the truss rod wrench. Try to break it loose, and sometimes it will pop. You can put some oil on the threads and nut and gently try to break it loose. If that does not work and you feel like you’re in over your head at that point take it down to your local qualified repair shop.
What Is The Recommended Truss Rod Neck Relief For A Guitar Or Bass?
The best neck relief is: .006”(.15mm) for all electric guitars, .008”(.20mm) for all acoustic guitars, .008”(.20mm) for 4, 5 and 6 string bass guitars and .010”(.25mm) for classical guitars.
OK, Now I Have All The Tools I Need, What Is The Process For Checking A Guitar's Truss Rod Neck Relief For Proper Action And Adjusting The Truss Rod?
- Use a capo or pick capo to hold the low E string against the 1st fret. If using the pick capo, slide it under the A string and on top of the Low E and D strings.
- Find the correct feeler gauge size for your instrument. Remember that the gauge you will need is .006″ (.15mm) for electric guitars, .008″ (.20mm) for acoustic and bass guitars and .010″ (.25mm) for classical guitars.
- With the instrument in tune, put it in the playing position
- With a finger press, the low E string is pressed down at the 12th fret so the string rests on the fret. The concept is to make a straight line with the string from the first fret(capo) to the 12th fret(finger) to measure neck relief in the middle 6th fret in the next step.
- Gently slide the gauge on top of the 6th fret and below the E string and follow the touch rule:
a. If the gauge rests on the fret and does not touch the low E string, you have too much relief, and you need to turn the truss rod nut clockwise.
b. If the gauge rest on the fret heavily and touches or lifts the E string you have back bow or too little relief and need to turn the truss rod nut counterclockwise.
c. If the gauge rest on fret lightly and touches the low E string you have the perfect neck relief and no adjustment is needed. - Once you determine which of the three scenarios you have, grab the truss rod wrench you need for your guitar. When turning the truss rod nut, make sure the wrench is well seated to the nut. Turn in the correct direction and don’t force it. If it feels stuck, turn the nut counterclockwise to loosen it. Don’t adjust the nut more than a 1/8” (3.2mm) of a turn each time.
- Check adjustment by repeating steps one through six until you have a light touch of the gauge to the string.
To follow along with a video on how to measure and adjust your guitar neck relief go here or watch below.
I Set My Truss Rod Neck Relief Correctly and I Am Still Getting Fret/String Buzz When I Play, What Should I Do?
You will need to adjust your string action height, which is the next step in a guitar setup.